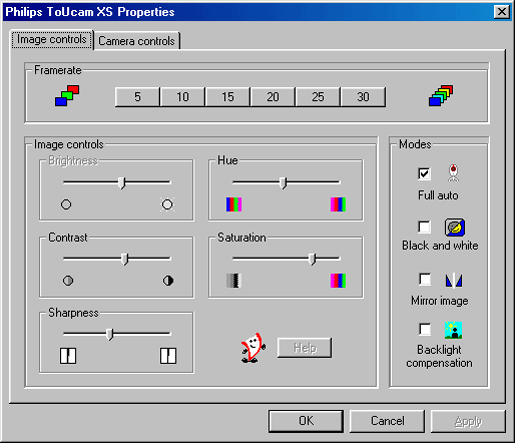
The first property tab is marked 'Image
Controls'.

Frame rate
The frame rate setting determines
the number of images per second in the video stream.
The set of frame rates from which the user can choose depends on the currently selected video format (resolution) and the available bandwidth on the USB bus (the number of devices connected to your USB port and the amount of data they transport). The buttons for invalid frame rates will be greyed out automatically and cannot be selected. To enable higher frame rates choose a smaller video image format in your application. Applications will usually offer resolution switching (image format setting) under menu items within the applications themselves.
Image
Controls
Here you will find the slider controls
for brightness, hue, contrast, saturation and sharpness. Note that the
Brightness control is not available when the Full auto setting is enabled.
The Hue control is only available when the Full auto setting is enabled
or when the Auto White balance on the Camera controls tab is turned on.
Modes
The Full Auto mode provides
a very easy way to get the best out of your camera. Or you can choose to
have maximum manual control over the camera settings by switching the Full
Auto mode off. Full Auto 'on' is the preferred setting for normal use as
it provides automatic exposure control and automatic white balance control,
to provide the best video possible.
The checkbox 'Black and white' is used to switch from colour images to black & white and back.
By clicking the checkbox 'Mirror Image', the image flips horizontally. This feature can be applied in order to use the camera and monitor as a mirror, or for taking pictures of mirrored images.
Turn on the backlight compensation
to improve the image quality when you have a scene where the background
has a high illumination level (for instance when you are sitting in front
of a bright light).
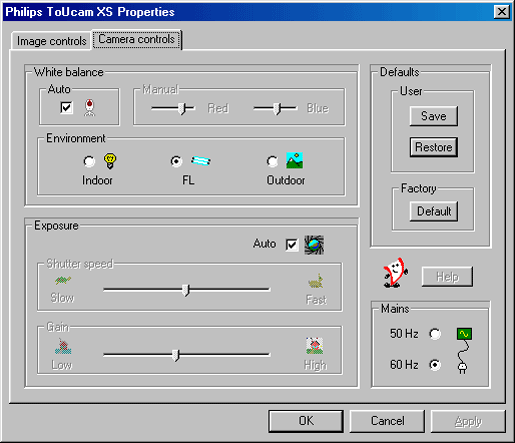
The next tab is marked 'Camera Controls'.

White
Balance
In Auto mode the camera automatically
controls the different colour components in the picture to obtain the most
natural colour reproduction. This setting is the preferred setting for
normal use.
Deselect the Auto mode and use the 'Red' and 'Blue' sliders to set a white balance manually.
The range of your Auto mode control will be influenced by your Environment setting (Indoor / FL / Outdoor). The Environment setting compensates for the specific colour spectrum of these types of lighting.
Only switch off the automatic white balance control when you have a colourful scene and stable lighting conditions. The current colour setting will remain frozen and will not be influenced by the camera's internal controls.
Exposure
The exposure setting determines the
amount of light that will fall onto the video sensor chip by controlling
the gain and shutter speed.
In Auto exposure mode the camera automatically adjusts the gain and shutter speed.
In manual mode (no check mark in the Auto checkbox) you can control the setting for gain and shutter speed manually.
Defaults
If you like a particular setting for
particular lighting conditions, you can use the Save and Restore buttons
to save and restore this preferred setting. Should you wish to restore
all standard settings, then click the Default button under Factory.
Mains
(flickerless)
The Flickerless control will be switched
on automatically if you have chosen to engage Auto White Balance in combination
with fluorescent light conditions (the option FL under Environment) to
prevent flickering or strangely coloured video images. Please indicate
under Mains whether your mains power frequency is 50 Hz (Europe) or 60
Hz (USA) so the Flickerless control will work correctly.
Access to the sound settings is dependent
on the application software. But usually it will look something like this
when you open a 'Sound Settings' option.

The camera has no built-in microphone, so a microphone (not included) connected to your sound card will be used as a sound input for your video application. Check your sound recording capabilities with a recording application, e.g. Sound Recorder from Windows. If you can record sound through your sound card with such an application, you should also be able to record sound and camera images together in any video application.
Frequency, Size & Channels
These are the standard parameters
of the audio data. You can change these parameters to suit your application
in the same way as the resolution setting, for example.
Capture Audio
Determines whether or not you want
to record sound with your video stream.
Some applications may offer you an extra tab marked 'Capture source'. Usually this setting has only one option when the USB PC Camera is the only video source connected to your computer. However, if more than one video source is connected to your system, then this is where you switch between them. Applications that don't show this extra tab will offer video source switching under a different menu item within the application itself.
NOTE: If you have two or more Philips
USB cameras connected to your computer, these cameras can only be used
one at a time.